

How to Install a Roll Up Door: A Complete Guide
Installing a roll-up door is a task that requires precision, knowledge, and attention to safety. This comprehensive guide, brought to you by the experts at Industrial Door Company based in Sacramento, walks you through the process step-by-step. From preparation to the finishing touches, we cover everything you need to know to ensure your roll-up door operates smoothly and safely.
Safety Considerations Before Installation
Before embarking on the installation process, it's paramount to prioritize safety. Installation should only be carried out by trained and qualified personnel who are well-versed in the proper techniques and safety precautions. Industrial Door Company emphasizes the importance of this step and disclaims liability for any incidents arising from the installation process. By proceeding, installers acknowledge and assume all risks.
Preparing Your Roll-Up Door for Installation
- Determine the Operation Method, Jamb Type, and Door Dimensions: It's crucial to have a clear understanding of these elements to ensure the compatibility of the door with the intended space.
- Inspection for Damage or Missing Parts: Before beginning, inspect the door and all accompanying components for any damage or missing pieces to avoid any unforeseen issues during the installation.
- Verification of Door Dimensions and Clearances: Make sure to double-check the opening dimensions and required clearances to ensure a smooth installation process.
Tools Required for Installation
- Electric Drill, Hammer drill, or Rotary Hammer
- Impact Driver with the correct sized sockets
- Drill bits (masonry or metal), Hammer, Screwdrivers
- Wrenches, Vise Grips, C-clamps, and Two Large Pipe Wrenches
- Plumb Line, Tape Measure, Chalk Line, Level, and a Water Level/Laser Level
- Personal Protective Equipment (PPE)
- Lifting Equipment (e.g., genie lift or forklift)
- Scaffolding, Mechanical Lift, and/or Ladders (Ladders are not recommended for larger doors)
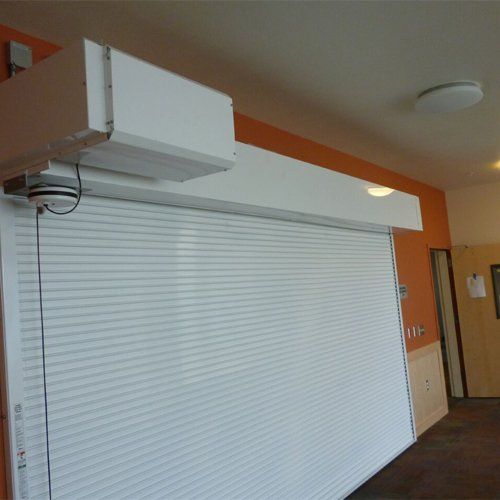
Installation Steps
Step 1: Wall Opening Check
Before the installation, it's essential to measure the width and height of the wall opening to ensure it matches the door's required dimensions. Use a plumb line and level to check that the jambs are perfectly vertical and that the floor and header are level, providing a solid foundation for the door. It's also crucial to verify there's sufficient clearance around the jambs, header, and sides of the opening, which allows the door to operate smoothly. Compliance with vertical and horizontal headroom requirements is another key factor to ensure a successful installation.
Step 2: Install Large Mounting Plates (if needed)
If your installation requires large mounting plates, attach them to the steel jambs, situating them 10 inches above the top of the opening. This step is vital for ensuring the plates are level and properly aligned with the edges of the opening. Depending on the setup, you may need to weld or bolt the plates into place, ensuring they are securely fastened and ready to support the door assembly.
Step 3: Attach Commercial Brackets to Guides
The next step involves securing commercial brackets to the guides, positioning them correctly for the tensioner and non-tensioner ends. It's important to use durable hardware to firmly attach the brackets, preparing them for attachment to the jambs. This step is crucial for the stability and proper functioning of the door.
Step 4: Guides and Bracket to Jamb
Mounting the guides and attached brackets to the jambs is a critical step. Select fasteners that are suitable for the material of the jambs, whether they're made of steel, concrete, or wood. Ensure the guides are centered relative to the opening and spaced correctly to accommodate the width of the door curtain. Proper alignment and spacing are essential for the door's smooth operation.
Step 5: Tensioner End
Installing the tensioner assembly on one end of the door is a delicate process that requires attention to detail. The orientation of the tensioner is critical for its function, so make sure it is correctly aligned before securing it in place. This component plays a key role in the door's operation, making its correct installation paramount.
Step 6: Stamped Axle Support End
The stamped axle support must be attached to the door bracket at the opposite end from the tensioner. Ensuring proper positioning and secure attachment of this component is essential for the structural integrity of the door assembly. The correct alignment of the stamped axle support is critical for the balanced operation of the door.
Step 7: Drive End Installation
Based on the specific type of door drive—whether push/pull, chain hoist, or electric operator—it's important to install the drive components accurately. This step ensures that the door operates efficiently and aligns with the tensioner and axle support, contributing to a smooth and reliable door movement.
Step 8: Lifting Door Assembly/Position Door
Using the appropriate lifting equipment, raise the door into place while maintaining a protective barrier between the door and any surfaces to avoid damage. It's crucial to position the door on the brackets with the tensioner and axle support resting securely on top of the bracket flange. The door should be positioned as close to the header as possible without hindering its rotation and ensuring that it clears the bottom bar.
Steps 9 & 10: Setting Initial Spring Tension and Installing Headstops
Before freeing the door from its shipping restraints, rotate it two full turns to set the initial tension. This preparation is key for the door's operational readiness. Subsequently, slide headstops onto the guides from the outside and secure them with appropriate hardware. Headstops prevent the door from traveling beyond its intended path, ensuring safe operation.
Step 11: Slide Lock, Step Plate & Pull Rope
For doors operated manually or via chain hoist, install the slide lock and step plate, attaching the pull rope as needed. For electrically operated doors, ensure the step plate is securely installed. These components are essential for the door's secure operation and ease of use.
Step 12: Check Manual Door Operation
Manually operate the door, raising and lowering it to check for smooth operation and the absence of obstructions or unusual noises. This test is crucial for identifying any issues with the installation that may need adjustment, such as spring tension, to ensure the door operates smoothly and efficiently.
Step 13: Adjust Spring Tension (if required)
Should the door require adjustment to its spring tension for balanced movement, secure the door in its fully open position and loosen the setscrews at both ends. Adjust the spring tension by using a tensioning device, increasing or decreasing tension as needed. Once the desired tension is achieved, tighten the setscrews and remove the tensioning device, ensuring the door moves smoothly.
Step 14: Install Product Safety Labels
The final step involves placing safety labels on.
Conclusion
By following these detailed instructions, installers can achieve a successful installation of a roll-up door. Proper alignment, component attachment, and tension adjustment are key to ensuring a smoothly operating door system. Remember, safety and precision are paramount throughout the installation process.
Should you require professional assistance or have any questions, the team at Industrial Door Company in Sacramento is always here to help.

REQUEST ESTIMATE OR SERVICE CALL
Call the guys that care.
Operating Hours
- Mon - Fri
- -
- Sat - Sun
- Closed
Emergency Service 24/7
10235 Systems Pkwy, Suite B
Sacramento, CA 95827
Contractor's License: 1118556